
Vernon:
GLASERS LUMBER COMPANY:

Corunna:
CORUNNA MILLS:


Owosso:
GLASERS LUMBER COMPANY:

Corunna:
CORUNNA MILLS:


Owosso:
Owosso Michigan, located on the Grand Rapids Subdivision (GR Sub), was the first section of the layout that I constructed before I had decided to focus my efforts on the Flint Sub.
Owosso was a very busy area when I was
growing up. The
location was once the interchange for the Grand Trunk Western's Grand Rapids Sub and Greenville Sub as well as the Ann Arbor and
Penn Central railroads.
The Grand Rapids Sub interchanges with the Flint Sub at Durand Michigan. Although it requires dismantling and rebuilding, I am opting to keep it as a part of the layout. My thoughts on this are that it will provide a change of tempo for an operator who prefers branchline operation as opposed to mainline running. In addition, this branchline segment will create a "live feed" of traffic to keep the Durand Yardmaster on his toes.
The Grand Rapids Sub interchanges with the Flint Sub at Durand Michigan. Although it requires dismantling and rebuilding, I am opting to keep it as a part of the layout. My thoughts on this are that it will provide a change of tempo for an operator who prefers branchline operation as opposed to mainline running. In addition, this branchline segment will create a "live feed" of traffic to keep the Durand Yardmaster on his toes.
All Greenville Sub (Turkey Trail) trackage north of Owosso, and GR Sub trackage west of Owosso will be represented by staging.

The Grand Trunk and Ann Arbor railroads continued to serve the area well into the 80's. I picked 1982 as my start period because the Ann Arbor was still using the ferry crossing at Frankfort, Michigan until later on that year.
Since
then, the Ann Arbor
has sold all trackage rights to the Tuscola & Saginaw Bay (TSBY). Likewise, the Central
Michigan railroad now operates all Grand Trunk lines north of Durand. The
Penn Central no longer exists here, the diamonds having long been
removed. Originally, I
chose to keep the PC line intact on my layout as the interchange
allowed for more operating potential. It is still up for consideration as I build the new segments, however I
have determined that there will be a sufficient op tempo in the area
that the diamonds could be removed.
The module that Owosso occupies in these photos was part of my original layout that has since been dismantled. The new module is already built and ready to start laying track down. The 4 new tables that make up the new Owosso mod are 6 foot each, giving me an additional 8 feet to expand the scene. The new module is built to Sipping and Switching Society specs and will also be dual purpose (Home Layout and Show Layout) to allow me to link up with the S&SS layout for display.
 |
| OWOSSO ELEVATOR |
 |
| G. YOUNG SEED BUILDING |
 |
| GTW DEPOT OWOSSO |
 |
| MIDWEST ABRASIVES |
 |
| MIDWEST ABRASIVES STREET VIEW |
 |
| WOODARD FURNITURE COMPANY |
 |
| MALLABLE IRON MACHINE SHOP |
 |
| MALLABLE IRON STREET VIEW |
ELEVATOR CONSTRUCTION:
This is a scratch-built structure for Owosso, Michigan.
It is full scale based off measurements I took while on leave. Lucky for me,
the next time I came home, the entire area had been leveled. I hope that the
scenery base, once in place, will improve the overall appearance. The roadbed
will also be lowered so the tops of the rails will be flush with the Luan base
of the model.

Here is a look at the loading bay. I still have a little bit of weathering for the front wall. On the
actual structure, there was another building on this side of the track however
space restrictions forced me to omit it.


This is the actual structure


I have been lucky on multiple occasions now with getting
my data " just in the nick of time". I would go home on leave and
take a bunch of pics and measurements. I would then have a list of follow up
data to collect the next time I was home only to find the entire area leveled.
If it has taught me anything, it is (1.) Get what you can when you can. (2.)
Whenever you think you have enough pics.... take more...get EVERY possible angle and keep a photo log.
I started laying out structures with simple place holders. In the case of the elevator, it was a cereal box and some paper towel tubes. After I was happy with locations, I cut out the PVC tubes so I could start getting used to the size and determine if I would need to slightly compress.
I started laying out structures with simple place holders. In the case of the elevator, it was a cereal box and some paper towel tubes. After I was happy with locations, I cut out the PVC tubes so I could start getting used to the size and determine if I would need to slightly compress.

I then finished the wood core (this was an experiment, and I will not be doing it again) and cut the styrene wall sections.
Fast forward through Afghanistan and I was ready to begin painting and
detailing.


I used several modeling mediums for this project. The core is MDF and Luan. The
Silos are PVC. The main structural areas are Styrene. The details are a mix of
brass, scrap bin parts, and toys liberated from my nephew's toy box.


Here are some different angles.


These shots give a better idea of the real estate this thing occupies on that
portion of the layout. For my future layout, which will be multi-deck, this
structure will likely be on the top deck.


This was not my first trackwork, however I was experimenting a little. I went with the Peco Code 75 here. If I had to do it again, I would not use the Peco C75. It had smaller rail yes, but the ties are in keeping with the old Atlas Code 100. That combination just doesn't seem to work for me. At the time, the desire for superdetailed track hadn't hit me yet. I will do what I can to weather and hide some of these (in my opinion) issues.
In interest of my wallet, on my future layout I will probably use the more detailed track around key focal point areas, and Atlas Cd 83 elsewhere. All of my old Atlas C100 track is reserved for staging.
I always used to take what I thought were a lot of progress shots. Once I started getting on these forums, I found that I was taking way too few.
Now when I start working on a project, I make sure to have a camera close by. It really helps for explaining/demonstrating. Additionally, it helps me remember what techniques I used for reference in future projects. I do the same thing with painting projects. I keep a "Paint Card" for every project I do. They are maintained in my filing cabinet so I can remember what colors or color combinations I used. I always kept a note pad handy before the digital age, but a photo log is so much better.
G. YOUNG SEED BUILDING:
This is the scratchbuilt G. Young Seed building. I am still not satisfied with the roof. I may try to add a little more detail. The building is selectively compressed to 2/3 the actual size. I have not yet finished the scenery base in this area.


MALABLE IRON CONSTRUCTION:
 |
| Corner Building |
 |
| Machine Shop in back |
These scratchbuilt structures for Owosso, Michigan are selectively compressed to fit the space available. Once again, work started with measurements and a cardboard mock-up.

I did utilize some DPM wall sections for the lower portion of the corner building because I felt that it was "close enough" to capture the flavor of this particular building. I then scratchbuilt the second story from Evergreen .040 clapboard siding. Unfortunately, I was not taking a great deal of photos during this build because I was still new to the forum and blog world. The next photo therefore jumps ahead to the completed corner building with basic weathering completed. Once the Owosso portion of the layout is complete, I will go back and follow up on final weathering.


THE MACHINE SHOP
This structure is completely scratchbuilt. The exterior of this building is based on photos taken in the late 90's and early 2000. Some liberties are being taken to backdate the exterior condition to what it most likely looked like while still in service. The interior is completely fantasy. I do not have any pictures of the interior of this building, nor was I able to get any while home on leave. The setting below is on my old modular layout which has since been replaced. The new modules will not afford any additional depth to the scene, but there will be a significant increase in width. This will allow me to get a more realistic lead into the spur on the back side of the building.

After I was satisfied with the dimensions of the cardboard mock-up, I cut the base out of .060 styrene. I then built the framework for the building itself. As can be seen in the photos of the actual building, there are a large number of windows in this building so when it is lit, most of the interior will be visible from the front. I wanted to do a shop interior, but again I had no photos of the actual interior layout. Having no experience myself in machine shops, I started researching and gathering ideas for shop designs and I threw together what I hope will be a plausible shop design.


MIDWEST ABRASIVE CO. CONSTRUCTION:


I determined that DPM wall sections could be utilized for the building nearest the backdrop, and a RIX Quonset hut could be used for the rear add-ons. In the image above I am using a small factory structure as a stand-in for the boiler house.

The MWA water tower is visible for nearly 1/4 mile in most directions. At the time that I was modeling Owosso, there were no sufficient water tower models available to fit the location. To scratchbuild this tower I used a small piece of PVC tube for the body. I then calculated cone dimensions and cut the cap out of .020 styrene. For the bottom I used a 25-cent gumball machine capsule. I then used brass and piano wire for the legs. The base flange for the main mast is a superglue cap.

Unfortunately, I did not get any additional progress photos of this build. In the next picture you can see the nearly completed model. There is still some additional work to be done on the roof tops. The new Owosso module will have more room for this scene so the Quonson hut may be extended to more closely represent the prototype. Once the scenery is in place, the entire structure will get some additional weathering.


The street view is compressed to the main building only since depth of the scene forced me to omit the wings.


NEW OWOSSO SECTION:
 |
| 3 of the 4 new sections of the Owosso Module |
This new version again is 24 feet in length allowing me to capture the area at roughly two thirds scale of the prototype. This is a size that I adopted as my standard while building Durand Yard that I will try to adhere to for all signature and operational areas in order to keep car movement proportional. The new Owosso is in keeping with all builds completed after Durand Yard.
One of the problems with expanding an existing scene that was already selectively compressed for a previous version is visual impact. For example, I am stretching the scene considerably to allow linear space however I am still restricted by the same/original depth of scene. In most cases this may not be an issue for the railroading aspect because you are essentially un-compressing the space, but structures are visually effected by un-proportional footprints. In my case there have been several areas where this has become evident. The upside however is that for every negatively impacted area has been an equally opportunistic potential for improvement. Scenic elements that were previously omitted due to space constraints can now be added back or expanded upon. For structures this is important because often times in our model worlds the size of the building/industry does not justify the number or volume of freight cars we try to pack onto the spurs.
A prime example is the Midwest Abrasives complex which is a large sprawling labyrinth of buildings. For my original layout, this was abbreviated down to a fraction of its size trying to capture key visual elements and the general flavor of the prototype. Tracks serving the facility were shortened, if not eliminated altogether. The new space will allow me to expand this complex back out and incorporate those previously considered elements that were too costly on space.
The freight house adjacent to Midwest Abrasives can also be expanded by an additional 1/3 of its original building length bringing it much closer to the appropriate proportional size.
The Owosso elevator was modeled full scale on my original layout to capture the size compared to the trains. The G. Young Seed building on the other hand was modeled to 2/3 scale. This worked on my original layout, but now I am regretting the decision to shrink the building. It will be something I am ultimately willing to live with however because the remainder of the layout must take priority. I will just keep a small baseball bat under the table for anyone who happens to come along and point out this deficiency.... or that the interior of my machine shop is COMPLETE fantasy.
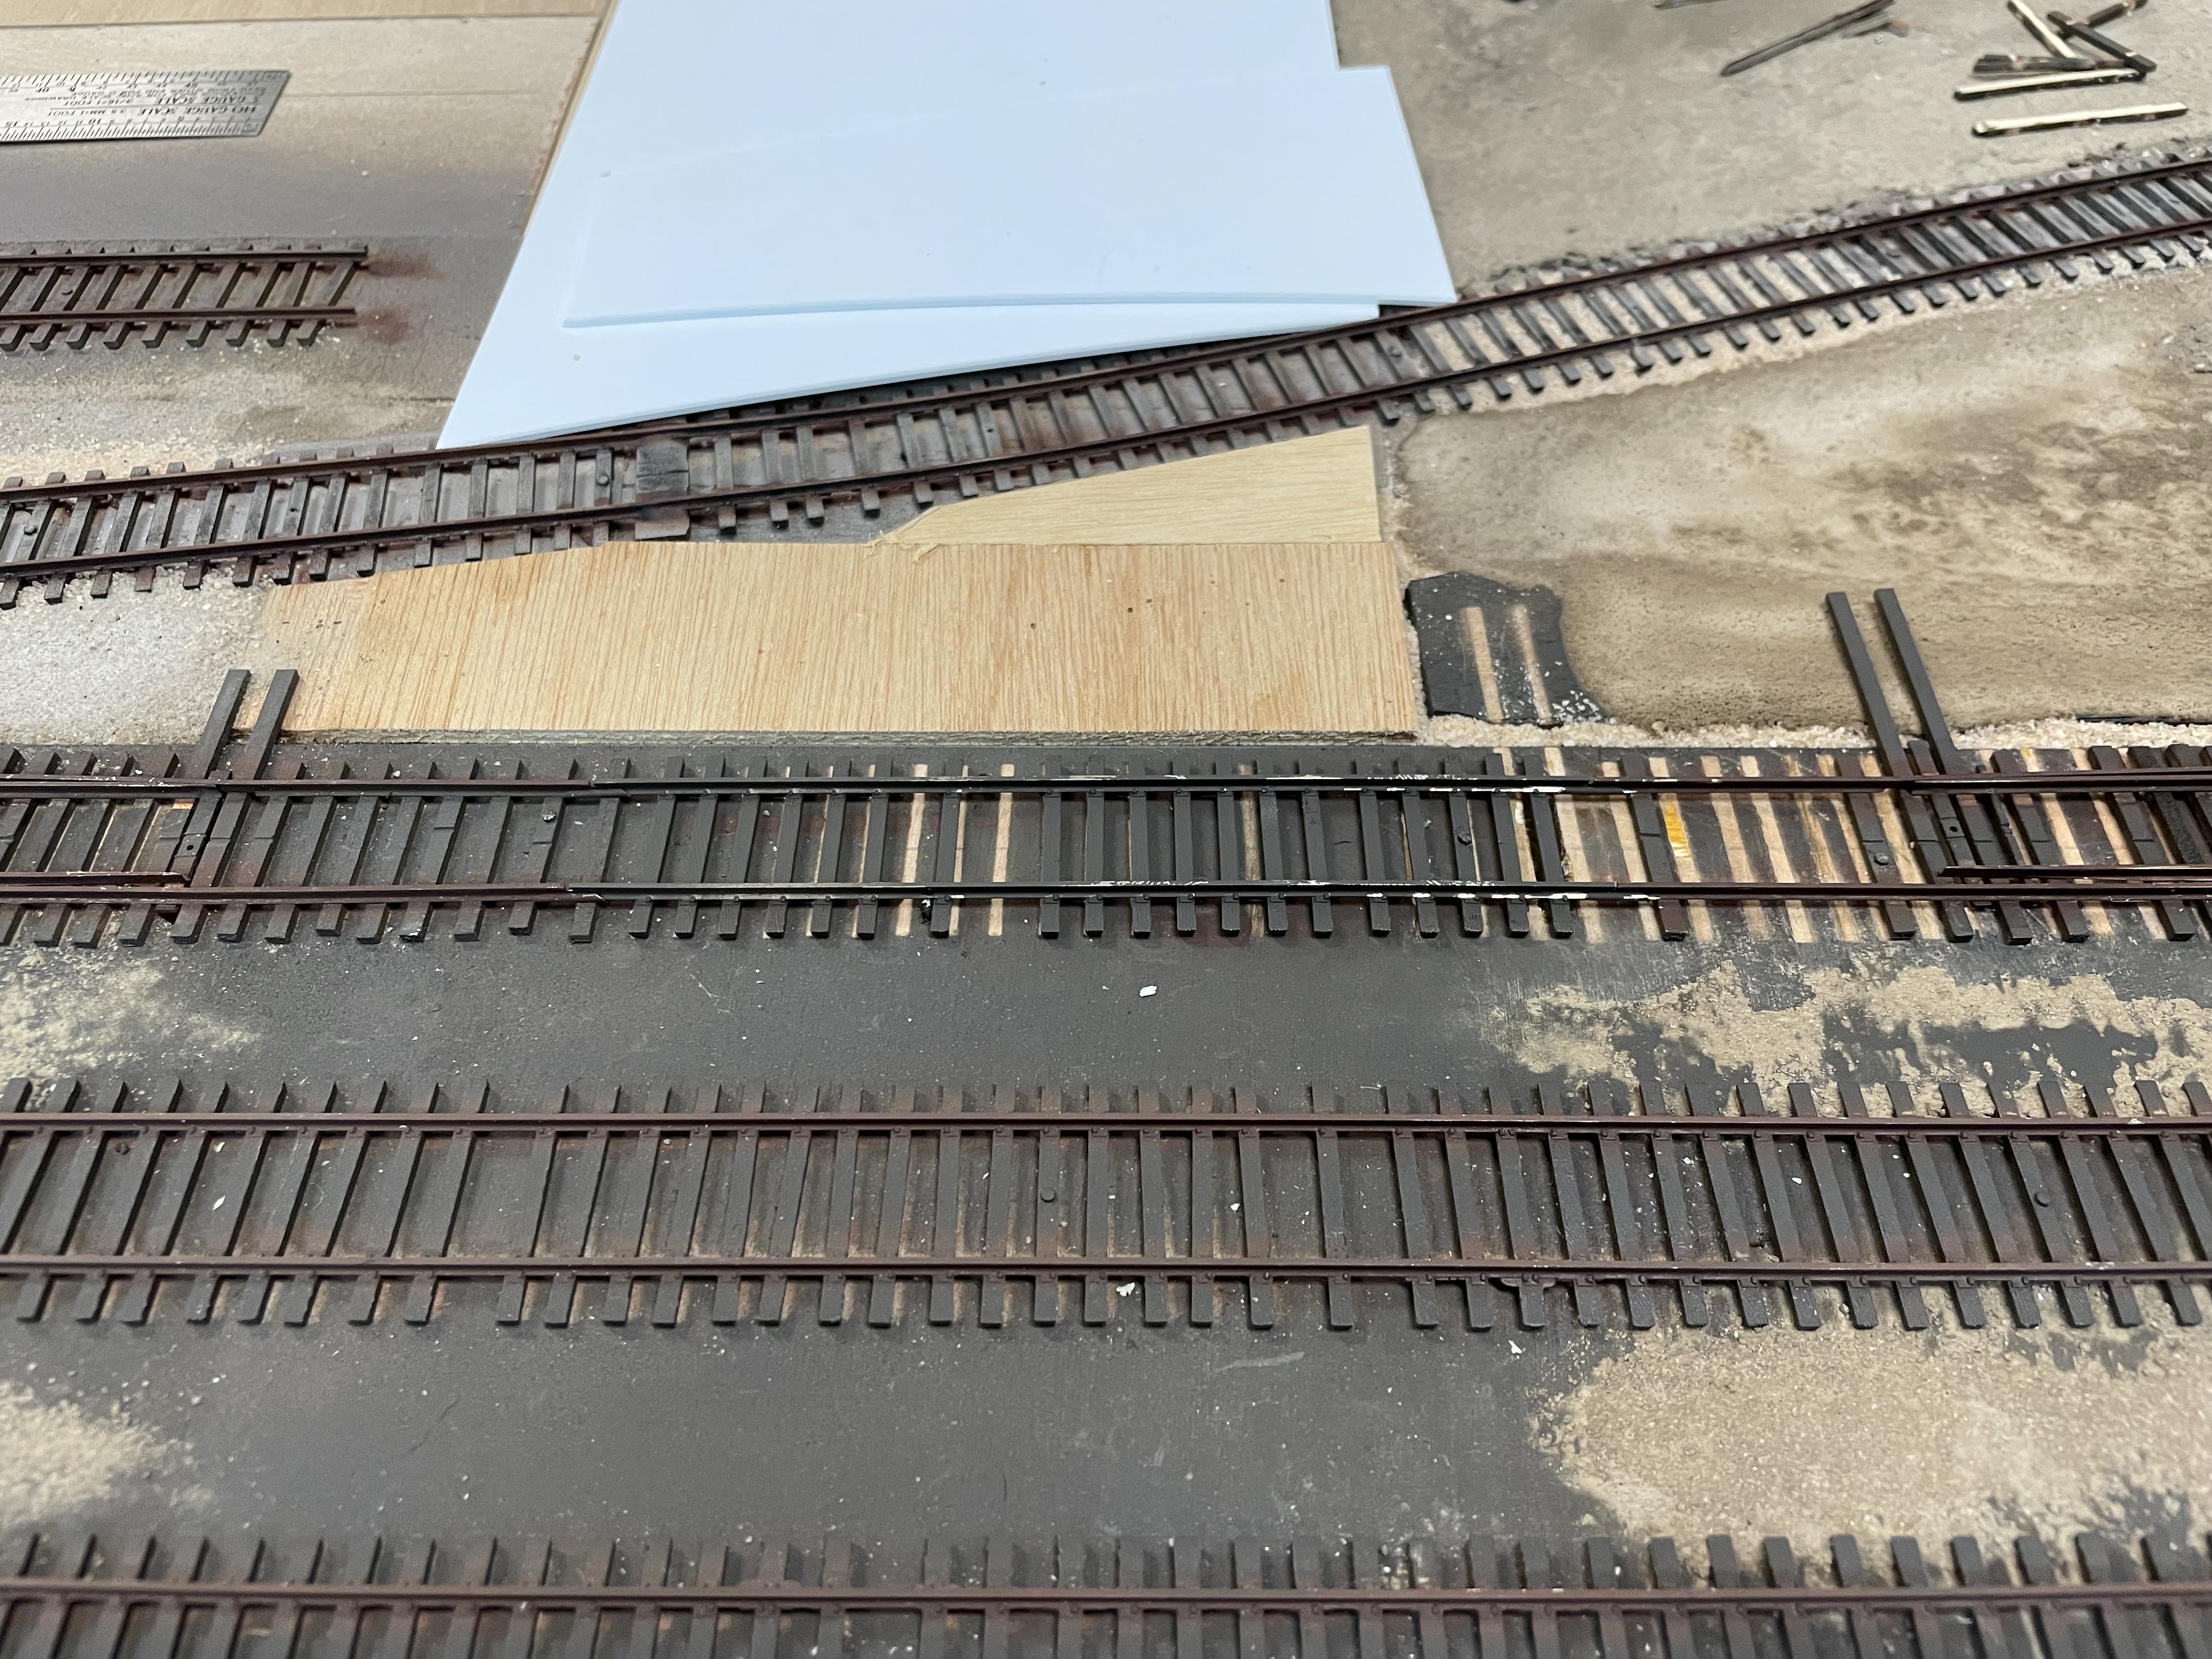
Track work for the new Owosso scene started with laying out the switch templates and track for visual reference. Utilizing the GTW track schematic, historic overhead imagery, and photographs, I began the process of stretching the scene to the new dimensions. This was a lengthy process that went thru several variations before I was satisfied. I was able to stretch the scene even further when I made the decision to push the Penn Central diamonds all the way to the left/north edge of the scene. I also pushed the depot, freight house, and MWA complex all the way to the right/south edge. I did this after realizing that two bookend sections would be necessary to tie this scene into the layout design.
 |
| Redesigning and stretching the scene. |
 |
| Adding the buildings in to ensure the track configuration will work. |
 |
| Laying out the trackwork. New space allows for #8 turnouts throughout. |


Wherever possible, I like to span the joints between sections with a solid piece of track. After the epoxy cures, I then cut the track with a razor saw. This ensures exact alignment.

As GTW yard neared completion, I began to lay out the connecting tracks to the elevator and Ann Arbor storage tracks which run along the back of the scene in front of the Woodards Furniture Co. and Owosso Iron and Metal.

The GTW yard is completed on the right side of the module, and the Ann Arbor trackage is being installed on the left.

A close up view of the Ann Arbor elevator tracks. The track on the far left is the spur track to Woodard's Furniture and Owosso Iron and Metal. Again the scene expansion did not include increased depth so modeler's license still had to be applied. There was actually an access drive for vehicular traffic into the facility that was located between the Ann Arbor tracks and the elevator. In addition, the space between the AA tracks and the Woodards spur was a two lane street. I will be modeling it as a single lane industrial alley.
After a group discussion with all my friends....they were both there....we determined that this scene would be best operated from both sides rather than only from the front / GTW side as originally intended. This means that a backdrop will be omitted obviously, but also opens up opportunity for including more of the local switching for the Ann Arbor.
After a group discussion with all my friends....they were both there....we determined that this scene would be best operated from both sides rather than only from the front / GTW side as originally intended. This means that a backdrop will be omitted obviously, but also opens up opportunity for including more of the local switching for the Ann Arbor.

A look from the opposite end of the Ann Arbor tracks. The spur on the right going off the table is the Valley Lumber lead which was located behind Woodards. There will be an extension build at a later date which attaches to the scene that will allow Valley Lumber to be represented by two staging tracks.

Once all the trackwork was complete, it was taken outside for the track primer coat.

After the primer dried, it was back inside to get rail painted and tie washes applied.

All of the structures were then placed back on the module.


Foam terrain and Ground Goop were applied next followed by sanded grout.


I then turned my focus to the Penn Central trackage and hand laying the two diamonds at the north end of town.
 |
| Penn Central trackage crossing the GTW in the foreground, and Ann Arbor in the background. |
 |
| GTW diamond |
 |
| Ann Arbor diamond |
Sub-roadbed and roadbed ballast followed, along with fine ground turf and the first layer of 2mm dead static grass.


The second layer of 2mm static grass is also dead/dying with a slightly greener color. The difference is very subtle but noticeable.

The next is a 2mm layer of live green.


Next is clumps and patches of Savanna grass.


And finally, tall patches of 7mm beige wild grass and Woodland Scenic straw. I must say I have not had a great deal of success in achieving the desired look with the WS straw. It does not like to stand up very well. I have been using it to make tufts which seem to look better.


Forest floor and vegetation were added to the areas that would eventually be wooded. The pad and parking area in the left foreground is where the Michigan Central station will be located.

I then moved on to cutting out styrene sections and test fitting the streets and sidewalks. I use .060 styrene for most of my roads and streets.
 |
| S. Cedar St. |
 |
| The space allocated for M52 was discovered to be too narrow. |
It was in the street test fitting that I discovered I had not allocated enough space between a couple of turnouts for the 4-lane M52 to pass between. I had forgot to leave space for the sidewalks. I ended up using some modeler's license here and moved the Midwest Abrasive spur switch to the right enough that I can swing the sidewalks in to be directly off the curbs of M52.
As it turned out, further study of time period track diagrams, aerial photography, and satellite images revealed that the entire spur needed to be adjusted forward anyway. From a scenery perspective this works out great because selective compression was going to make it difficult to have a plausible sized representation of the Midwest Abrasives dock area.

 |
| The shifted spur track |
 |
| The new space allocated for M52 and sidewalks |
 |
| M52 crosses GTW on the left and Ann Arbor on the right |

The added space after moving the spur track will certainly help, but Midwest Abrasives will still be compressed quite a bit.

 |
| Curbs and surface detail being applied to S. Cedar St. |
 |
| AA crossing guard rails being soldered in place. |
 |
| Sidewalks |
 |
| Test fitting everything |
 |
| S. Cedar St. glued in place |
Everything about your layout impresses me Jeff and it motivates me to work on my own layout with my dad but its the Owosso portion of your layout that always brings me back. The layout that my dad and I are building is a freelanced version of 1980s Durand and Owosso. A layout we call the GTW Arlee subdivision. Any information or photos that you could share would be greatly appreciated. Thank you in advance
ReplyDeleteNot sure who to address here, but contact me offline via my email in the contact information on the homepage. I have many pictures of the areas you will be interested in and it sounds as if we will be modeling the same time period.
ReplyDeleteThis is amazing work. I stumbled upon this page almost by accident and was sent back 20 years. I shared a link to it on the Historic Owosso page. I'd like to extend you and my fellow commentators an invitation, if you're so inclined, to please share some of your photos on our group's page.
ReplyDeletehttps://www.facebook.com/groups/208880839133735/
Jeremiah thank you for the invitation. I checked out the facebook page and can see that I will definitely be frequenting it in the future. You are certainly more than welcome to share any photos you like on my blog page with the group. I wish cameras had been as readily available back in the day as they are now. I would have had so many more. That being said, I try to get out and photograph many of the older buildings every time I come home. On more than one occasion...this elevator included...the next time I came home it was gone.
DeleteWow, excellent work Jeff. My mom worked at TSBY for years first in Vassar and then in Owosso. It's like a tribute to see your efforts here.
ReplyDeleteThank you Bob. I hope to create a scene that recaptures some of the flavor of the area when Owosso was still a busy location for the railroads.
DeleteWhat is unfortunate is that most of the industries you modeled are now out of business and the buildings either derelict or repurposed with no rail connection. What you did was capture a slice of Owasso history in time with a good feel for the reality if not exact replicas. Please tell me more about the Owasso depot.
ReplyDeleteCertainly trying to catch the feel for a place in time, even if it is not 100% accurate. Owosso was my first bit of serious modeling. As I get back into the construction of this area of the layout, I will try to incorporate as much relevant history as I can.
Delete